My O Gauge Journal on
Modelling the GWR
A personal Journey
A dry run
using the transfers
Do a dry one piece run first. This was key for me in successfully
applying transfers. None of these transfers will be applied as one
piece. That was my downfall on previous attempts and had resulted in
a waste of time and money and only useful if you suffer from low
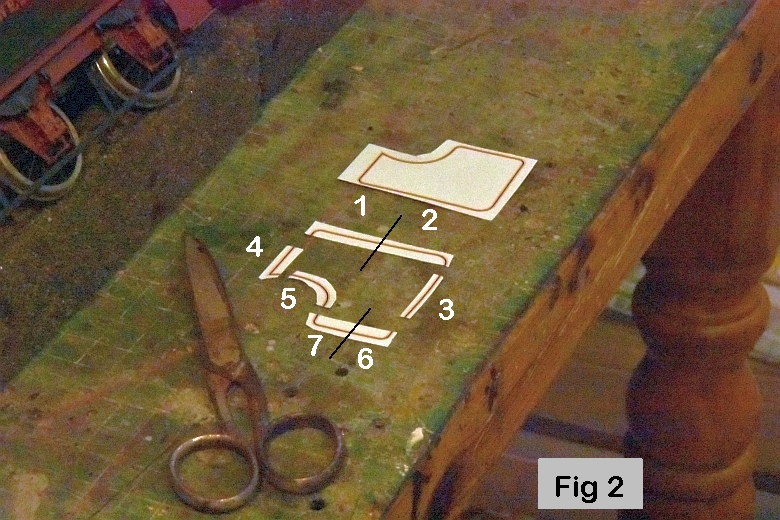
blood pressure! They are to be cut up into small sections as shown
in Fig 2 and each section is to be applied separately in a
predetermined order. How they are cut up is therefore important and
you should choose the way that makes their application the easiest.
So start initially with it in one piece, (fig 3) and match the
transfer against the area it is to fit in. Often space is tight or
needs the transfer to lose a few mms along its straight edges. Doing
this will help you assess what needs to be done. As shown here in
Fig 2, to accommodate the cab sides I had to split the side pieces
into 1 and 2 and 6 and 7 to reduce their lengths on the cab sides.
The dry run determines how you will do that.
Apart from checking sizes, you also need to be aware of
potential obstructions so take your time to see how a piece will fit
first, again as a dry run. Obstructions like pipes and handrails and
even rivets you have to thread the transfer under or over will add
to your success rating. A particular piece of transfer may also have
to be cut itself to avoid a larger protrusion on the boiler. When
you are satisfied, cut up the transfer into workable pieces and work
out the order in which you will apply those pieces. Leave a small
area of backing paper around the transfer so that you can use it to
manipulate the transfer later. Test all that out before using the
water bath. Then put one piece at a time into the water bath when
you are ready to apply it to the loco body.